注意: このページでは WordPress 5.0 から導入された「ブロックエディター」(Gutenberg) を使用して説明します。それ以前のバージョンのクラシックエディターの使用方法についてはこちらのページを参照してください。
投稿とは、ホームページやブログページに新しいものから古いものの順番で表示されるエントリーのことです。通常、それぞれの投稿の下にはコメント欄があり、サイトの RSS フィードに含まれます。
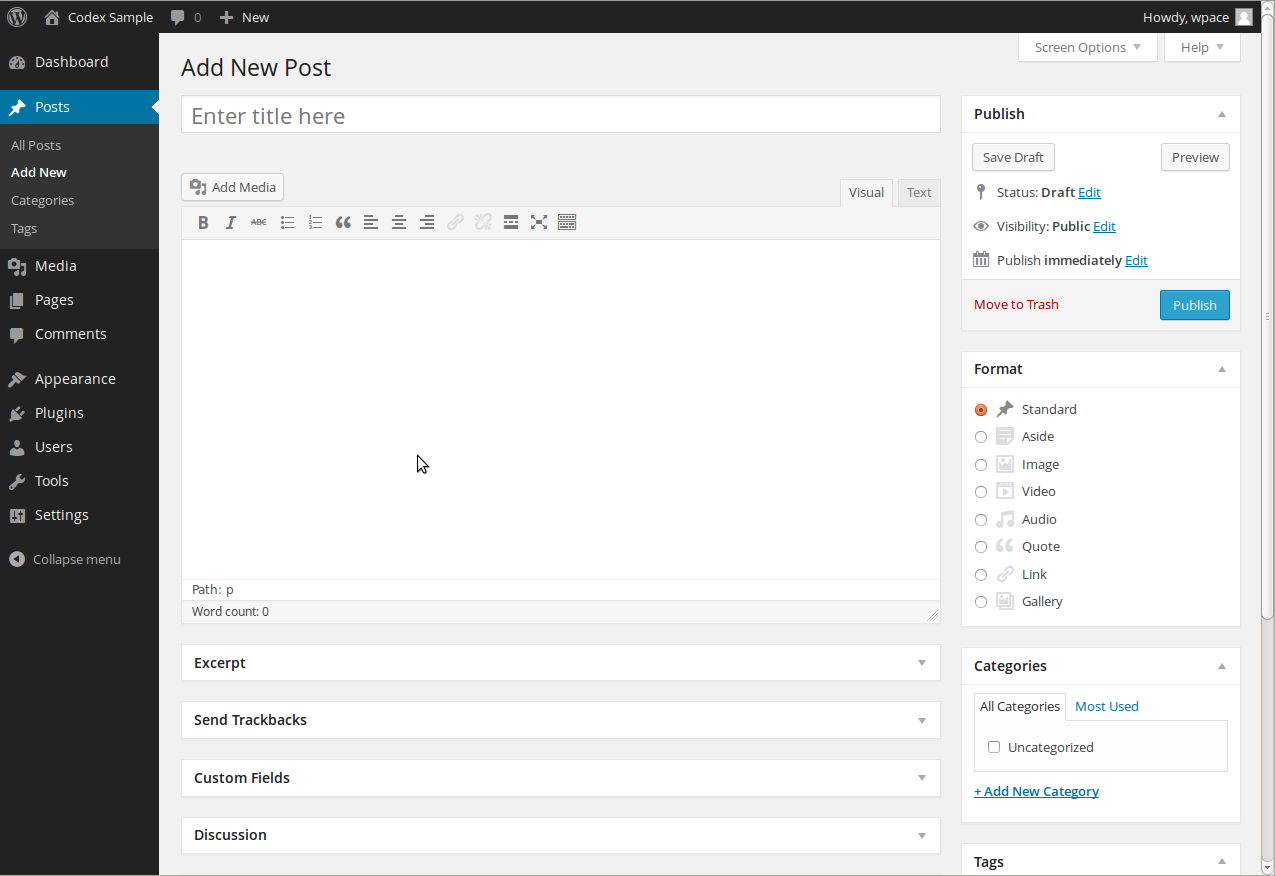
投稿するには
- WordPress の管理画面 (ダッシュボード) にログインします。
- サイドバーメニューの「投稿」をクリックしてください。
- その下の「新規追加」をクリックしてください。
- 空いているところを埋めていきます。上のフィールドに投稿のタイトルを入力し、その下のメインの投稿編集ボックスにコンテンツ本体を記入します。
- 必要であれば、カテゴリーやタグを選択し、各セクションの設定を選択します。それぞれのセクションについては、以下で説明します。
- 書き終えたら、公開ボタンをクリックします。
画面オプション
最初にログインした際に表示される編集フィールドよりも多くのフィールドを利用可能です。表示オプション領域では編集画面でどの投稿フィールドを表示するか、非表示にするかを選択して、画面を整理し必要に応じてカスタマイズできます。
表示オプションタブは画面の最上部にあり、クリックすると使用可能な編集ボックスのリストが表示されます。表示する投稿フィールドのボックスをオンにするか、隠すモジュールのボックスをオフにします。表示オプションタブを再度クリックするとタブが閉じます。
編集画面のカスタマイズが完了するとオプションは保存されるため、次回ログインした際に再度表示、非表示する必要はありません。
各フィールドの説明
Title/Headline Box
This box should contain the title of your post. You can use any phrase, words, or characters. (Avoid using the same title on more than one page.) You can use commas, apostrophes, quotes, hyphens/dashes, and other typical symbols in the post like “My Site – Here’s Lookin’ at You, Kid.” WordPress will then clean it up to generate a user-friendly and URL-valid name of the post (also called the “post slug”) to create the permalink for the post.
Permalink
Permalink stands for “permanent link.” That means a post URL that does not expose the post ID which could be subject to a change (e.g. when moving to different blogging system), but it rather contains a user-friendly post name derived from the post title which could also change, although not recommended, but in a more controllable way. This post name (also referred to as “post slug” or just “slug”) can be edited, depending on your Permalinks settings, using the “Edit” button. (To change your settings, go to Administration Panels > Settings > Permalinks). The permalink is automatically generated based on the title you set to the post and is shown below the title field. Punctuation such as commas, quotes, apostrophes, and invalid URL characters are removed and spaces are substituted with dashes to separate each word. If your title is “My Site – Here’s Lookin’ at You, Kid”, it will be cleaned up to create the slug “my-site-heres-lookin-at-you-kid”. You can manually change this, maybe shortening it to “my-site-lookin-at-you-kid”.
Body Copy Box
The blank box where you enter your writing, links, images, links to images, and any information you want to display on your site. You can use either the visual (WYSIWYG) editor or the text view to compose your posts. For more on the text view, see the section below, Visual Versus Text Editor.
Publish Box
Contains buttons that control the state of your post. The main states are Draft and Published. Draft means the post has not been published and remains in draft status for the post creator. A Published status means the post has been published and is live on your site.
Preview Button
Allows you to view the post before publishing.
Save Draft
Allows you to save your post as a draft rather than immediately publishing it. To return to your drafts later, visit Posts – Edit in the menu bar, then select your post from the list.
Status
If you select a specific publish status (click Edit next to Status:Draft) and click the update post or “Publish” button, that status is applied to the post. For example, to save a post in the Pending Review status, select Pending Review from the Publish Status drop-down box, and click Save As Pending. (You will see all posts organized by status by going to Administration Panels > Posts > Edit).
Visibility
This determines how your post appears to the world. (click Edit next to Visibility) Public posts will be visible by all website visitors once published. Password Protected posts are published to all, but visitors must know the password to view the post content. Private posts are visible only to you (and to other editors or admins within your site).
Revisions
Click Browse to see all of the changes you’ve made to your post.
Scheduling
To schedule a post for publication on a future time or date, click Edit next to the words “Publish immediately.” You can also change the publish date to a date in the past to back-date posts. Change the settings to the desired time and date. You must also click the Publish button when you have completed the post to publish at the desired time and date.
Format Box
Allows you to choose a format for a post. Styling and appearance are handled by the individual themes.
Categories Box
The general topic of the post. It is typical for a blog to have 7-10 categories for content. Readers can browse specific categories to see all posts in the category. You can manage your categories by going to Administration Panel > Posts > Categories.
Tags Box
These are micro-categories for the post, similar to including index entries for a page. Posts with similar tags are linked together when a user clicks one of the tags. Tags have to be enabled with the right code in your theme for them to appear in your post. Add new tags to the post by typing the tag into the box and clicking “Add.” You can also click on the “Choose from the most-used tags” link to see all of the tags used by the site.
Excerpt
A summary or brief teaser of your post that may appear on the front page of your site as well as on the category, archives, and search non-single post pages. Note: the Excerpt does not usually appear by default. It only appears in your post if you have modified the template file listing the post to use the_excerpt() instead of the_content() to display the Excerpt instead of the full content of a post. If so, WordPress will automatically use as the Excerpt the first 55 words of your post content or the content before the <!–more–> quicktag. If you use the “Excerpt” field when editing the post, this will be used no matter what. For more information, see Excerpt.
Send Trackbacks
A way to notify legacy blog systems that you’ve linked to them. If you link other WordPress blogs, they’ll be notified automatically using pingbacks. No other action is necessary. For those blogs that don’t recognize pingbacks, you can send a trackback to the blog by entering the website address(es) in this box, separating each one by a space. See Trackbacks and Pingbacks for more information.
Custom Fields
Custom Fields offer a way to add information to your site. In conjunction with extra code in your template files or plugins, Custom Fields can modify the way a post is displayed. These are primarily used by plugins, but you can manually edit that information in this section.
Discussion
Options to enable interactivity and notification of your posts. This section hosts two check boxes: Allow Comments on this post and Allow trackbacks and pingbacks on this post. If Allowing Comments is unchecked, no one can post comments to this particular post. If Allowing Pings is unchecked, no one can post pingbacks or trackbacks to this particular post.
Post Author
A list of all blog authors you can select from to attribute as the post author. This section only shows if you have multiple users with authoring rights in your blog. To view your list of users, see Administration Panel > Users. For more information, see Users and Authors.

WordPress Admin Writing Post Advanced Panel – Bottom of Page
Note: You can set basic options for writing, such as the size of the post box, how smiley tags are converted, and other details by going to Administration Panel > Settings > Writing.
投稿のベストプラクティス
You can say or show the world anything you like on your WordPress site. Here are some tips you need to know to help you write your posts in WordPress.
Practice Accessibility
To be compliant with web standards for accessibility, be sure to include ALT and TITLE descriptions on links and images to help your users, such as <a title=”WordPress.ORG” href=”https://wordpress.org/“>WordPress.ORG</a>.
Use Paragraphs
No one likes to read writing that never pauses for a line break. To break your writing up into paragraphs, use double spaces between your paragraphs. WordPress will automatically detect these and insert <p> HTML paragraph tags into your writing.
Use Headings
If you are writing long posts, break up the sections by using headings, small titles to highlight a change of subject. In HTML, headings are set by the use of h1, h2, h3, h4, and so on.
Use HTML
You don’t have to use HTML when writing your posts. WordPress will automatically add it to your site, but if you do want control over different elements like boxes, headings, and other additional containers or elements, use HTML.
Spell Check and Proofread
There are spell check Plugins available, but even those can’t check for everything. Some serious writers will write their posts in a text editor with spell check, check all the spelling and proof it thoroughly before copying and pasting into WordPress.
ビジュアルエディターとテキストエディター
When writing your post, you have the option of using the Visual or Text mode of the editor. The visual mode lets you see your post as is, while the Text mode shows you the code and replaces the WYSIWYG editor buttons with quicktags. These quicktags are explained as follows.
- b –
<strong></strong>HTML tag for strong emphasis of text (i.e. bold). - i –
<em></em>HTML tag for emphasis of text (i.e. italicize). - b-quote –
<blockquote></blockquote>HTML tag to distinguish quoted or cited text. - del –
<del></del>HTML tag to label text considered deleted from a post. Most browsers display as striked through text. - link –
<a href="http://example.com"></a>HTML tag to create a hyperlink. - ins –
<ins></ins>HTML tag to label text considered inserted into a post. Most browsers display as underlined text. - ul –
<ul></ul>HTML tag will insert an unordered list, or wrap the selected text in same. An unordered list will typically be a bulleted list of items. - ol –
<ol></ol>HTML tag will insert a numbered list, or wrap the selected text in same. Each item in an ordered list is typically numbered. - li –
<li></li>HTML tag will insert or make the selected text a list item. Used in conjunction with the ul or ol tag. - code –
<code></code>HTML tag for preformatted styling of text. Generally sets text in amonospaced font, such as Courier. - more –
<!--more-->WordPress tag that breaks a post into “teaser” and content sections. Type a few paragraphs, insert this tag, then compose the rest of your post. On your blog’s home page you’ll see only those first paragraphs with a hyperlink ((more...)), which when followed displays the rest of the post’s content. - page –
<!--nextpage-->WordPress tag similar to themoretag, except it can be used any number of times in a post, and each insert will “break” and paginate the post at that location. Hyperlinks to the paginated sections of the post are then generated in combination with the wp_link_pages() or link_pages() template tag. - lookup – Opens a JavaScript dialogue box that prompts for a word to search for through the online dictionary at answers.com. You can use this to check spelling on individual words.
- Close Tags – Closes any open HTML tags left open–but pay attention to the closing tags. WordPress is not a mind reader (!), so make sure the tags enclose what you want, and in the proper way.
Workflow Note – With Quicktag buttons that insert HTML tags, you can for example click i to insert the opening <em> tag, type the text to be enclosed, and click /i or Close Tags to insert the closing tag. However, you can eliminate the need for this ‘close’ step by changing your workflow a bit: type your text, select the portion to be emphasized (that is, italicized), then click i and your highlighted text will be wrapped in the opening and closing tags.
この記事は役に立ちましたか ? どうすればさらに改善できますか ?
フィードバックを送信するにはログインする必要があります。